User Area
Software Release History - Version 14
Index
| Version
14.7 | Version
14.6 | Version
14.5 | Version
14.4 | Version 14.3 | Version 14.2 |
Version
14.1 | Version
14.0
New
Facilities and Improvements in Version 14.4
Overview
LUSAS
Version 14.4 contains:
-
A range of new and
improved features for bridge and structural users
-
A number of
significant general modelling, results viewing and other user
interface improvements for all users.
-
Various useful and
often asked-for development requests
-
Improvements to
network licencing
-
Updates to online
documentation and printed manuals
The
main features in these new facilities and improvements are grouped
according to type as follows:
New
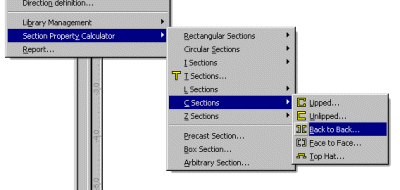
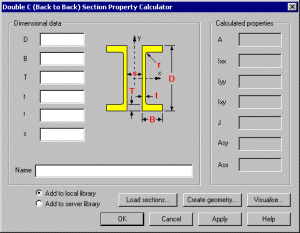
section property generators / calculators
Additions to the standard
section property calculators
New Standard section
property calculators have been provided for an unequal flanged
I-section, an I-section haunch shape, unequal walled rectangular
hollow sections, back to back L-sections, C-sections (lipped and
unlipped, back to back and face to face), Z-sections (lipped and
unlipped) and a top-hat section. These new sections join the existing
standard section property calculators and accessed from the Utilities>
Section Property Calculator menu item.
Single
and multi-cell pre-cast box section property calculator
A Box Section Property
Calculator is now provided in Bridge and Civil & Structural
software products. It calculates the section properties of a single or
multiple box cross section created from user defined dimensional data.
The section shapes can be defined either as a simple cross-section or
as complex section created from as many lines as are required to form
a suitable representation of the true cross-sectional shape. A void
can be included or excluded from a section. Generated sections can be
saved in project section libraries or converted into model geometry
for additional manipulation.
|
|
|
|
Simple box
section with void
|
Simple box
section without void
|
|
|
|
|
Complex box
section with void
|
Complex box
section without void
|
Addition to supplied
standard section libraries
Visualisation
of section properties
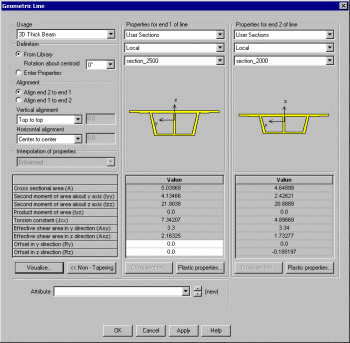
Tapered arbitrary
cross-sections
Tapered arbitrary
cross-sections can now be defined for supplied or user-defined
sections that are saved to a section library. Previously only standard
cross-sections could be specified to taper along a beam's length.
Tapered sections are defined by using the Attributes > Geometric
> Line (From Library) and Attributes > Geometric > Section
Library (User section) menu items and specifying section properties
for each end of the beam. When the tapering option is chosen, the
vertical and horizontal alignment of one end of the beam section from
the other can be specified and the method of interpolating the section
properties for locations along a beam can also be defined using an
enhanced or linear method if an exact calculation cannot be made.
Offsets (eccentricities of beam ends from nodal positions) can also be
defined.
|
|
|
|
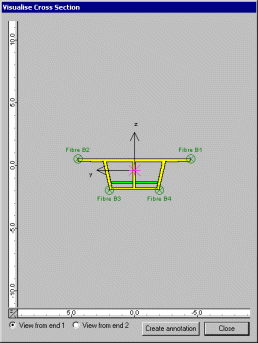
Selecting
cross-sections to defined a tapering section
|
Alignment
visualisation of tapering cross-section
|
Fleshing of arbitrary
cross-sections
|
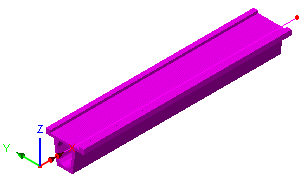
|

|
|
Fleshing of a
constant arbitrary section on a beam element
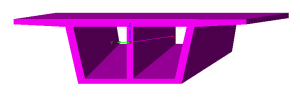
|
Fleshing of a
tapering arbitrary section on a beam element
|
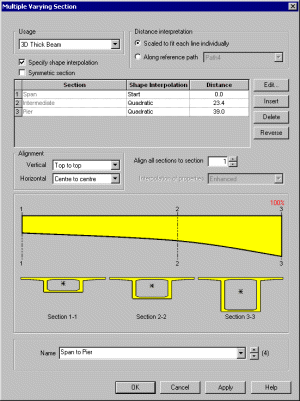
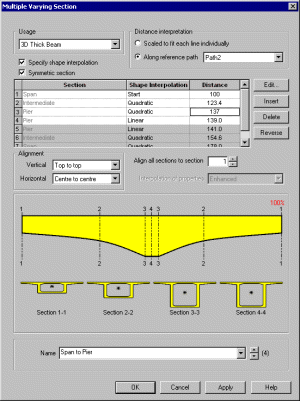
Multiple varying sections
based upon a distance along a line or path of lines
A new multiple varying
section facility enables pre-defined cross-sections to be
specified at distances for subsequent assignment to a single line or
to a series of lines with reference to a pre-defined reference path.
On the dialog, a table is
built up specifying the section shapes which define the varying
section, the interpolation method to be used in order to describe the
change of section shape between sections, and the alignment method to
be used to set-out each section with respect to another. As the
multiple varying section is defined in the table, a visualisation of
the longitudinal vertical alignment of the cross-section shapes used
is displayed on the same dialog.
The multiple varying
section dialog is accessed by using the Attributes > Geometric
> Multiple Varying Section menu item.
|
|
|
|
Varying sections
defined for assignment to a single line
|
Varying sections
(with distances defined in chainage values) defined to follow
a reference path
|
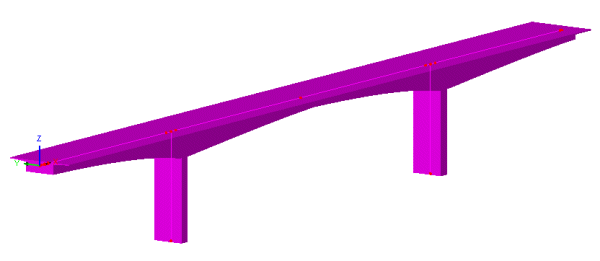
Use
of the new multiple varying section facility will enable simple
prototype and assessment models of bridges formed of tapered box
sections to be created in a very straightforward manner. When combined
with the reference path facility more detailed modelling can be done.
|
|
|
Varying section
line attributes assigned to single lines on a model
|
Reference paths
Reference paths are
a new concept introduced in this release. A reference path defines a
route through the model, that provides a concept of distance to each
point in the model. Those distances can be used in the definition of a
varying section, such that when the section is assigned to lines, the
path is used to interpret which part of the section is appropriate to
each line. Bridge engineers refer to this reference path concept as
chainage. Once specified on the Path definition dialog, the
data that defines the path can be viewed in the Utilities  Treeview. Like other utilities, paths are not directly assignable to
geometry and can only be edited by editing their properties via their
context menu.
Treeview. Like other utilities, paths are not directly assignable to
geometry and can only be edited by editing their properties via their
context menu.
Reference paths are
primarily used for line beam models (such as those that are required
for staged construction analysis) and for use with grid or grillage
models where longitudinal and transverse beams are modelled with
individual grillage or line beam elements and the actual profile of
the longitudinal members as a whole may vary along the longitudinal
beam's length.
|
|
|
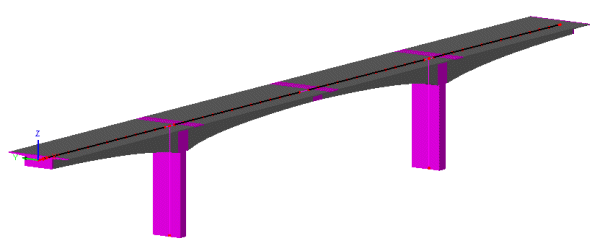
Varying section
line attributes (shown selected) assigned to multiple lines on
a model with reference to a path
|
Use of the new multiple
varying section with the reference path facility will enable complete
models of bridges formed of tapered box sections to be created in a
very straightforward manner. If necessary, one geometric multiple
varying section line attribute can be defined for a series of multiple
varying sections at specified distances (chainages) that define the
complete end-to-end run of cross-sections for a bridge. When used to
create more detailed line beam models for use with activation and
deactivation facilities, it is possible to create models for staged
construction analysis much quicker and far easier than previously.
 A new worked example, '3-Span Concrete Box Beam Bridge of Varying Section' has been added to the Application Examples Manual (Bridge, Civil
and Structural). This examples illustrates the use of the new multiple varying sections and reference path facilities. A new worked example, '3-Span Concrete Box Beam Bridge of Varying Section' has been added to the Application Examples Manual (Bridge, Civil
and Structural). This examples illustrates the use of the new multiple varying sections and reference path facilities.
Loading
and supports
Discrete compound loads
(Load sets or load trains)
Compound
loads may be created to simply the definition and assignment of
more complex loads. Compound loads form a set, or load train, of
previously defined discrete loads that are subsequently assigned to a
model as one loading.
A
compound discrete load attribute may be defined from any combination
of existing point, patch and compound discrete loads. Creating a
compound discrete load attribute is similar to the way in which a load
combination is created, namely, predefined discrete load types are
dragged from the Available panel of the Compound dialog into the
Included panel. When created, compound discrete loads are held in the
Loading section of the Attributes  Treeview in their own section named Compound. Compound loads enable
complex loading patterns to be defined using far fewer actual loading
attributes than were required previously.
Treeview in their own section named Compound. Compound loads enable
complex loading patterns to be defined using far fewer actual loading
attributes than were required previously.
Editing of discrete
loading data
Editing
of pre-defined discrete loading data now allows users to view both the
original vehicle definition input data, as well as the actual loading
applied (the vehicle load converted into a discrete load format), for
any and all vehicles within LUSAS. After the creation of a vehicle
load, the resulting attribute in the Attributes
Treeview now has a special context menu entry named Edit Definition in
addition to the existing Edit Attribute context menu entry. These
menus can be seen by right clicking on the attribute.
Oregon vehicle loads
Load factor assignment /
changing
-
The load factor that
is defined during assignment of loading attributes is now appended
to the loading name in the Loadcases  Treeview. This displays as, for example, (x1.0) or (x2.0). Where
previously only one item represented all load factor assignments,
now each loading entry represents all those assignments having the
same load factor. This makes for easier checking and changing of
assigned load factors.
Treeview. This displays as, for example, (x1.0) or (x2.0). Where
previously only one item represented all load factor assignments,
now each loading entry represents all those assignments having the
same load factor. This makes for easier checking and changing of
assigned load factors.
-
Load factors of
assigned loads can be changed by viewing the Loadcases
Treeview and right-clicking on the loading name and selecting the
Change load factor menu item from the context menu.
Loading visualisation
Stress and Strain loading
Prestress loading changes
Improved
tendon profile definition is provided for multi-tendon use. The
tendon profile dialog allows tendon profiles to be defined or copied
and pasted from a spreadsheet. It also shows tendon profile geometry
and allows specification of line segment connection type when a tendon
profile has been generated by defining lines, arcs or splines in
Modeller. Tendon profiles are now stored in a new Utilities layer.
-
Options for defining
tendon segments and their control points are: Straight, Arc Bulge,
Arc Centre, Spline, Parabola Bulge, or Spline Continued.
-
Smoothing options
allow the definition of a minimum radius around or through which
two intersecting tendon segments will be shaped.
In addition the following
tendon related changes have been made:
-
Tendon diameter has
been replaced with tendon area on all prestress dialogs
-
Deassignment and
deletion of any single tendon or all multi-tendon prestress wizard
created loading from the Attributes Treeview is now permitted.
-
Tendon integrity
checks are now made. If a model is altered, you are reminded that
the prestress loads (which were calculated by the prestress
wizard) will need to be recalculated.
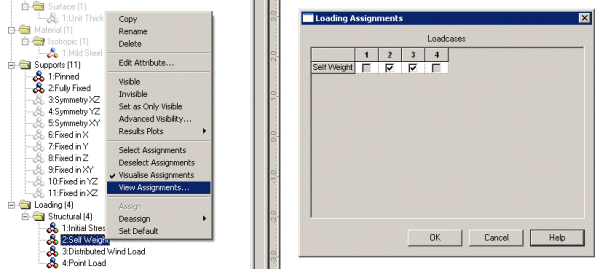
Deassignment of loading
and supports
It is now possible to
quickly deassign attributes such as supports and loading from assigned
loadcases by deselecting the items listed in the View assignments
dialog.
Viewing
Results
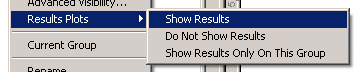
Results plots
 The
method of showing results on groups, section slices and slidelines as
provided originally in Version 13 of LUSAS has been re-instated. The
method of showing results on groups, section slices and slidelines as
provided originally in Version 13 of LUSAS has been re-instated.
Three new menu entries,
Show Results, Do Not Show Results, and Show Results Only On This Group
have been added to the context menu for group names, section slice
names and slideline names. These are all accessed from within the
Results Plots menu item.
The same functionality has
also been added to the context menus of all assigned attributes in the
Treeview and for selected items in the View window by using the
context menu for the item selected. This means that:
-
Isolated results for
assigned material types, geometry, mesh types, supports or
loadings can be easily plotted without having to define individual
groups for these items.
User Defined Results
A new
User Defined Results facility allows results components to be
defined by creating arithmetic expressions based upon results
entities, components, model data and other user-defined results
component calculations. A component name and description can also be
entered.
A
results file must be loaded in order to define a user results
expression.
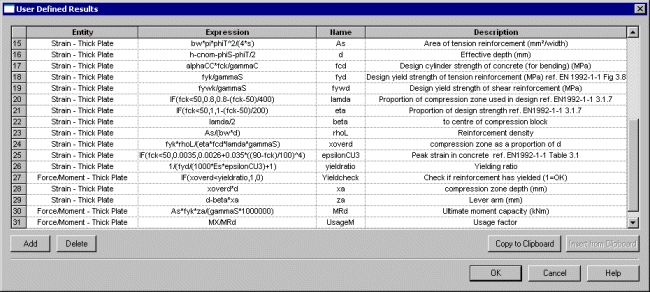
After definition, the
created user results components can be selected by name from the
Component drop-down list on the Contours, Values, and Diagrams layers
properties dialogs. Graphing
of user defined results is also possible.
Report generator
-
IMD loadcases can now
be added to a report. These are selected on the Model properties
chapter dialog.
-
Eigenvalues results
can now be added to a report. These are selected on a new
Eigenvalues chapter dialog.
-
It is now possible to
specify different numbers of significant figures or decimal places
for each report chapter inside a report. For example, a report can
contain a results subchapter that lists displacements with a
precision of 3 decimal places and have another results subchapter
that lists Forces / Moments to 6 significant figures. It is also
possible to override this by setting a value to be used for all
chapters on the main Report properties dialog.
-
Documentation
describing the use of the report generation facility has been
extensively updated to detail all aspects of its use.
Load combinations: combined
Interactive Modal Dynamics (IMD) results and linear results
Plotting results on
slices through the model
-
When cutting a slice
section through a 3D model an option to create an annotation
polygon is now provided. This annotation polygon effectively
defines the orientation of the cutting plane and gets saved with
the model. This annotation polygon may be re-selected if a model
is reloaded at a later date in order to generate and view results
at the same location.
-
As an alternative to
using annotation polygons, slice section results can also now be
plotted using surfaces to indicate and slice section locations.
These surfaces do not have to surround a model, they must simply
be defined in the orientation of the cutting plane required.
Cracking and Crushing
-
A new component Crack/Crush
has been added to the Values dialog to allow plotting of cracking
and crushing symbols on concrete material models. Choosing Crack /
Crush will produce the fullest failure plot possible, including
crack planes and/or crush locations, dependent upon the material
model in use. The Crack option previously on the Vector properties
dialog has been removed.
Graphing
Print
results wizard
General
user interface improvements
Layer visibility on/off
-
Treeview layers can
now be turned on/off to prevent having to delete them from the
Layers  Treeview in order to stop layer data from being displayed in the
model view. This is done by selecting the On/Off menu item from
the layer's context menu. Turning a layer off retains the layer in
the Layers
Treeview but removes the display of that layer from the Graphics
Area. A symbol adjacent to each layer name in the Layers
Treeview shows the visibility and status of each layer:
Treeview in order to stop layer data from being displayed in the
model view. This is done by selecting the On/Off menu item from
the layer's context menu. Turning a layer off retains the layer in
the Layers
Treeview but removes the display of that layer from the Graphics
Area. A symbol adjacent to each layer name in the Layers
Treeview shows the visibility and status of each layer:
 A coloured layer symbol indicates that the display of the layer
has been turned 'on'.
A coloured layer symbol indicates that the display of the layer
has been turned 'on'.
 A greyed-out layer symbol indicates the display of the layer has
been turned 'off'.
A greyed-out layer symbol indicates the display of the layer has
been turned 'off'.
 No results are loaded or currently available for this layer, or
inappropriate settings are currently set.
No results are loaded or currently available for this layer, or
inappropriate settings are currently set.
Layer names for results
layers
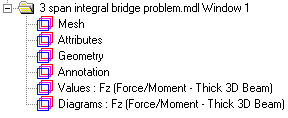 Contours,
Diagrams, Vectors and Values results layer names as added to and seen
in the Layers
Treeview now have the component (such as Mx, My or Fz, for example),
appended to the layer name followed by the entity type such as
(Force/Moment - Thick 3D Beam). If different component and entities
are selected at a later time the layer name in the Layers
Treeview is updated to reflect the chosen selection. Contours,
Diagrams, Vectors and Values results layer names as added to and seen
in the Layers
Treeview now have the component (such as Mx, My or Fz, for example),
appended to the layer name followed by the entity type such as
(Force/Moment - Thick 3D Beam). If different component and entities
are selected at a later time the layer name in the Layers
Treeview is updated to reflect the chosen selection.
New Utilities layer
A new Utilities layer has
been introduced. This controls visualisation of Tendon Profile,
Reference Path, Background Grid and any other software
product-specific utility data.
Labels
-
The Labels properties
dialog now allows selection and labelling of Annotation features
and of labelling the Description of selected Line, Surface, Volume
and Element features. When labelling these features line length,
radius, surface area, volume size and element type are also
included.
Joints
Colouring surfaces
according to their connectivity
-
The ability to colour
surfaces by their connectivity to other features is provided. This
works in a similar manner to the way in which the option Colour by
Line Connectivity works. Features are drawn in different colours
according to the number of higher order features that are
connected to them. To use, go to the Layers
Treeview and right-click on the Geometry layer name, select
Properties from the context menu and choose to colour by Surface
Connectivity, clicking Set to filter the displayed surfaces based
upon their connectivity status. One example of use is for checking
models created from the import of 3D CAD data where the use
of this option would enable any surfaces that were not correctly
forming volumes to be seen. Use of the merge facility could be
used to correct and connect any unmerged and isolated features.
Expressions
-
A new if
(condition, then, else) logical condition has been added to
all existing expressions that can be used when inputting values on
text entry fields and grids throughout the Modeller user
interface. A full list of expressions and functions
available has been included in Appendix E of the Modeller User
Manual.
Editing of geometric and
material data
Geometric
line and material data added to the Treeview as a result of selecting
an item from the section or material library will now display the
original library dialog as opposed to a generic section or material
input dialog when the section or material attribute in the Treeview is
edited. To change material properties to add, for example, plastic
properties to an isotropic material right-click on an attribute name
and choose Edit Attribute.
Datatips
-
The data tip (seen
when hovering your cursor over a model feature) now also reports
the underlying geometric feature type e.g. straight line, arc,
planar surface as well as provide dimensional data for that
feature e.g. length of line, radius of arc, area of surface etc.
Thermal analysis
Rate of Internal Heat
Generation (RIHG) loading
New
field material models have been included which incorporate the
concrete heat of hydration and HPM resin cure kinetics properties. As
such, the requirement to define concrete and resin cure models via the
assignment of a separate internal rate of heat generation loading to
selected features is no longer required.
-
Input of concrete heat
of hydration properties is now achieved by entering data on the
Thermal tab of either the isotropic or orthotropic material
dialogs.
-
Generalised user
defined RIHG loading can still be defined.
-
For more details refer
to the Element Reference Manual.
Various other user
interface improvements
-
The number of decimal
places can be specified in addition to significant figures when
plotting numeric output.
-
A new radio button
permitting the saving of a model to the current folder has been
added to the New Model dialog.
-
A keyboard shortcut (Ctrl
+Shift key) has been added to allow deselection of already
selected items.
-
After features have
been selected, using the Ctrl + M
key sets the selected items into Selection Memory.
-
A notes section has
been added to the Model Properties dialog to allow entering of
model-specific notes.
-
It is now mandatory to
save a model file prior to solving to prevent results being out of
sync with models.
-
All annotation data
added to the Annotation layer is now given an identifying name.
This is done automatically if no user-defined name is given. One
example of use is for plotting results on slices through the model
where previously defined annotation polygons defining a slice
through a model may be re-selected if a model is reloaded at a
later date in order to generate and view results at the same
location.
-
When a model is
created the default paper size (for printing use) is now set from
the settings of the default printer installed on the local PC.
This should help ensure that regional paper sizes are used in
preference to otherwise specified sizes.
New elements /
changes to elements
New crack tip elements
and crack tip modelling attribute
-
The family of crack
tip elements has been extended to include 20 node hexahedral
(HX20K), 15 node pentahedral (PN15K) and 10 node tetrahedral
(TH10K) 3D quadratic continuum crack tip elements. These elements
are specifically designed to be applied to fracture mechanics
problems and may be used to model the singularities that occur at
the crack tip. See the Element Reference Manual for
details.
-
When modelling, a crack
tip attribute can now be defined and assigned to any point in
a 2D model or at any point or line in a 3D model. After
assignment the mid-point nodes of any quadratic continuum elements
adjacent to the crack tip assignment are automatically moved to
the nearest quarter point position within the element and the
continuum elements adjacent to the crack tip assignment are
automatically replaced with an equivalent crack tip element.
New composite solid and
field elements
-
A 3D solid laminated
composite tetrahedral element (TH10S) and a 3D solid composite
tetrahedral field element (TF10S) has been released for use by
composites users. Laminated tetrahedral elements allow meshing of
composite components to be carried out using standard tetrahedral
meshing software and their use can give large savings in modelling
time when compared to using hexahedral and pentahedral elements
for complex geometry problems. See the Element Reference Manual
for details.
-
XML interface allows
import of drape information allowing designers to define drape
using FiberSIM or Advanced Composite Modeller.
-
Layer top/bottom and
mid surface results can be examined to determine stresses, strains
and composite failure criteria.
New 3D flat thin
nonlinear shell element
Changes to elements
-
3D Thick Shell
elements (TTS3, TTS6, QTS4, QTS8) permit the setting of a new
option (option 396) which invokes an improved transverse shear
calculation. This new option is set �on� by default for models
created by version 14.4 and above, and set �off� - for models
created by previous versions.
Network
Licencing
Improved Network
Licencing
Changes
have been made to make the use of LUSAS licences simpler and to ensure
that licences are only used as appropriate.
-
An updated
Configuration Utility Licensing page now lists all available
licences and provides the means to add and administer all Network,
USB and Dongle licences through a single dialog.
-
A new licence
selection dialog can be optionally displayed to allow users to
select a particular LUSAS licence. It lists all available licences
(including all Network, USB and Dongle licences listed in the
FEA.KEY file), along with details of the licenced product options,
licence type, server name, number of available licences and the
number of days left until expiry.
-
If the licence
selection dialog is turned off Modeller will now work its way
through the list of licences on the Configuration Utility
Licensing page until a valid and available licence is found.
-
If an analysis is run,
LUSAS Modeller now passes all details of the licence it is running
with to LUSAS Solver, including the minimum set of licence options
required to solve the job. Solver then tries to use the same
licence as the Modeller licence and if not possible re-orders all
suitable Solver licences and internally lists them such that the
least functional Solver licence that is still able to solve the
job is attempted first.
-
If Modeller is running
with Teaching and Training limits Solver also runs with the same
limits (effectively not using a Solver licence)
-
Shortcuts to Modeller
and Solver executables can be created that also specify a
particular licence to be used.
 Documentation Documentation
User Manuals
All relevant documentation
has been updated for this new release and is provided in PDF format as
part of any V14.4 software download file or on the V14.4 software CD.
Particular changes of note include:
-
The use and creation
of toolbars and toolbar buttons has now been documented in the
Modeller User Manual
-
Documentation
describing the use of the report generation facility has been
extensively updated in the Modeller User Manual to detail all
aspects of its use including the creation of sub-reports and
exporting of data to spreadsheets.
Changes to Worked
Examples
-
All existing worked examples have been reviewed and updated as necessary for this new release.
-
A new worked example, '3-Span Concrete Box Beam Bridge of Varying Section' has been added to the Application Examples Manual (Bridge, Civil
and Structural). This examples illustrates the use of the new multiple varying sections and reference path facilities.
Retired
elements and facilities
Printed version
|
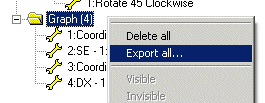 It
is now possible to export either selected or all graph datasets to
a .csv file by using the context menu for the Graph entry or graph
dataset name in the Utilities treeview. Columns of data are
created with graph dataset names being written to row one of each
column.
It
is now possible to export either selected or all graph datasets to
a .csv file by using the context menu for the Graph entry or graph
dataset name in the Utilities treeview. Columns of data are
created with graph dataset names being written to row one of each
column.